

This blog post walks through the best solution featured in a prior blog post “Build Efficient, Performance Optimized Processes, Part 2.”
Here are a few lessons learned from implementing this revised use case:
- Uses only one record create task flow element to create the task record with different wait times in addition to the appropriate task subject based on the opportunity stage with the same values for the other task fields. Optimized for performance and maintenance in visual workflow.
- Task wait time and task subject can be updated outside of the visual workflow via a custom metadata type for each opportunity stage. Optimized for maintenance.
- Data records associated with a custom metadata type are deployable via a changeset. You can locate the data records by looking for the custom metadata type’s name under the Component list. Do not look for it under Custom Metadata Type.
- Provide descriptions, where provided, in Salesforce. This may be tedious step, I know, but your future self will thank you when you are trying to remember what you configured or assist other/future admins when troubleshooting or enhancing what was built. This includes noting the data stored in a custom field, providing the purpose of a process builder, etc.
Business Use Case: After Addison Dogster implemented the solution, she received her first enhancement request from Sales Manager, Sally Sunshine. The task that is created is no longer an immediate action, but now is a scheduled action, with an execution time that varies on the opportunity stage.
Solution: Addison came up with a declarative solution using the following components:
- Custom Metadata Type, stores the task subject and wait time values in configuration so if it needs to be updated in the future, changes can be made outside of touching the flow.
- Visual workflow, looks up the task subject and wait from the custom metadata type and creates a task.
- Process Builder, to initiate the process when the opportunity stage field is changed to Prospecting, Qualification, Closed Lost or Closed Won for an opportunity record with the record type Opp2.
- Add the “Run Flows” system permission to allow users to run visual workflow.


Quick Steps:
Assumptions: The opportunity (Opp1 and Opp2) records types already exist in the system. We will not cover the steps of creating those in this blog post.
1.Create a new custom metadata type called “Task Reference” under Setup | Develop | Custom Metadata Type in Salesforce Classic or Custom Code | Custom Metadata Type in Lightning Experience.
Label: Task Generation Reference
Plural Label: Task Generation References
Object Name: Task_Generation_References
Best practice tip: Don’t forget to provide a description so you and other/future admins know what this custom metadata type is used for.
A. Now, let’s create four custom field to hold the opportunity stage name, task subject, wait number and wait unit.


Best practice tip: Don’t forget to provide a description so you and other/future admins know what this custom metadata type is used for.
B. Create the custom metadata type data record by clicking on the Manage Task References button. Create a record named after the opportunity stage. Provide the opportunity stage, task subject, wait number and wait until for each opportunity record.

For all four opportunity stages…

The end result…

2. Create the visual workflow (Create | Workflows & Approvals | Flows in Salesforce Classic or Process Automation | Flows in Lightning Experience). The visual workflow looks up the custom metadata type where the opportunity stage equals the opportunity stage passed from process builder, then waits the appropriate time (based on the opportunity stage) and then creates a task record with the subject “Follow up on opp stage: <opportunity stage name>” and the same values for the other task fields.

A. We will create 6 variables upfront.


Best practice tip: Don’t forget to provide a description so you and other/future admins know what these variables are used for.
B. Create the Record Lookup flow element called “Lookup Task Reference Custom Metadata Type”. This will look up the custom metadata type created in Step 1. Query it Opportunity_Stage__c equals to the opportunity stage passed from process builder (varOpportunityStage) and take the values in the task subject, wait number and wait unit and store them in their respective variables.
Mark this as the flow’s Starting Element.


Best practice tip:
- Don’t forget to provide a description so you and other/future admins know what these variables are used for.
- Don’t forget to check the box “Assign null values to the variable(s) if no records are found.”
C. Create a Decision flow element that will confirm that there are task subject, wait number and wait unit values for the opportunity stage exists from the custom metadata type to continue with the flow. Otherwise, it will hit a runtime error when if the custom metadata data record is missing a value.

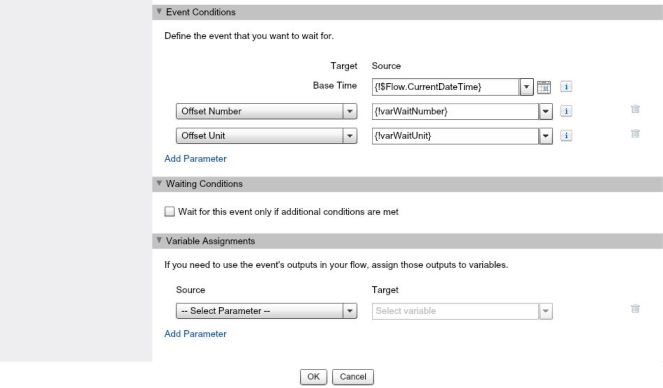
D. Create the Wait flow element called “Wait Task” that will wait a period of time as defined for the task in the Task Generation Reference custom metadata type.
We are setting the base time to the system defined current date/time.
Then, we need to add a row for the Offset Number and set it to the variable varWaitNumber and another row for the Offset Unit and set it to the variable varWaitUnit.
We do not need anything under the variable assignment, so we will delete the sample row that Salesforce added for us by default.

E. Create a Record Create flow element called “Create Task” that will create the follow up task with the variable being the task subject line.


F. Draw the other connectors between the flow elements.
[Note: The visual flow diagram includes the Record Lookup element: Using Custom Metadata Type in Visual Workflow Fault Email.
As a best practice, where there is a DML action (fast or record create, update, delete or lookup action) in a flow, you should also include notification of a flow fault.
Note: To avoid “hardcoding” email addresses in a fault email, refer to a post Using Custom Metadata Type in Visual Workflow Fault Emails.
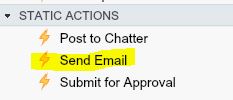
Select the Send Email flow element that is listed under Static Actions, not under Quick Actions.
Best practice tip: Don’t forget to provide a description so you and other/future admins know what this send email element is supposed to do.
Configure the body to show the fault message, subject and email address(es).
Body: Fault Message: {!$Flow.FaultMessage}
Subject: Error: Generate a Task WAIT – Best Solution
Email Addresses (comma-separated): <email address>

You will need to draw a connector line between the Record Lookup, Record Create and Send Email elements.
Can’t seem to get the fault connector to appear? Create a temporary flow element (circled below), draw your first connector to that temporary flow element. Then, draw another connector to the send element. This connector has the word “FAULT” in it. Once that is completed, delete the temporary flow element you created.
This is the end result.

[Note: The visual flow diagram includes the Record Lookup element: Using Custom Metadata Type in Visual Workflow Fault Email. If you choose not to implement that,your starting element is the Record Lookup “Lookup data from the Custom Data Metadata Type Flow Reference”.]
G. Click on the Save button and provide the following information
Best Practice Tip: Don’t forget to provide a description so you and other/future admins know what this visual workflow is for.
H. Click the “Close” button.

I. On the flows screen, activate the flow.

3.Create a process builder (Create | Workflows & Approvals | Process Builder in Salesforce Classic or Process Automation | Process Builder in Lightning Experience). The Process Builder will execute on the Opportunity object, when it is created or edited. There is only one criteria node: Opportunity Stage field is changed and the Record Type is Opp2. The immediate action is to invoke a flow, passing userId, opportunityId and opportunity stage name to the visual workflow.

A. We’re going to genericize this and call it” Take Action on New/Existing Opportunities.”

B. Let’s select the Opportunity object and have the process start “when a record is created or edited.

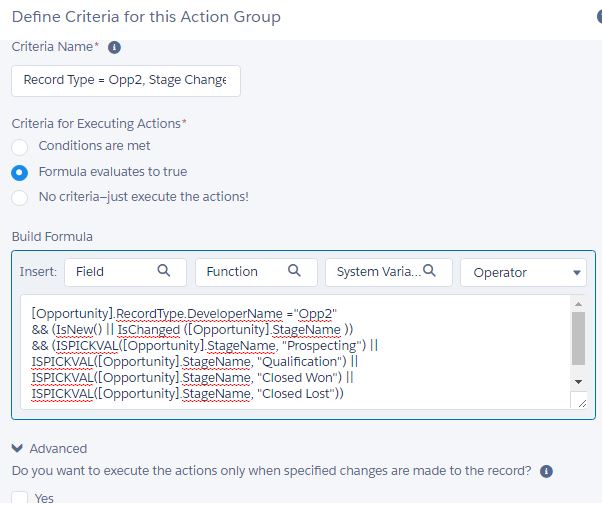
C. We have one criteria node. Let’s call this “Record Type = Opp2, Stage Change” where the formula evaluates to true. The reason why we are using a formula here rather than point and click criteria selection is that we cannot select the new record attribute, we need to use formula syntax.
This is the formula:
[Opportunity].RecordType.DeveloperName =”Opp2″
&&
(ISPICKVAL([Opportunity].StageName, “Prospecting”) || ISPICKVAL([Opportunity].StageName, “Qualification”) || ISPICKVAL([Opportunity].StageName, “Closed Won”) || ISPICKVAL([Opportunity].StageName, “Closed Lost”))
&&
(IsNew() || IsChanged ([Opportunity].StageName ))
Here is what the formula is doing…
//Opportunity’s record type developer name is “Opp2″[Opportunity].RecordType.DeveloperName =”Opp2″
//and operator
&&
//The opp stage is either Prospecting, Qualification, Closed Won or Closed Lost (ISPICKVAL([Opportunity].StageName, “Prospecting”) || ISPICKVAL([Opportunity].StageName, “Qualification”) || ISPICKVAL([Opportunity].StageName, “Closed Won”) || ISPICKVAL([Opportunity].StageName, “Closed Lost”))
//and operator
&&
//Record is new or an existing record where the Stage is changed
(IsNew() || IsChanged ([Opportunity].StageName ))
The end result looks like this…
D. Under Immediate Actions, we will invoke the visual workflow created in Step 2. We will pass the current user ID invoking this flow (we are using a formula to get to this information), the opportunity ID and the opportunity stage.
Action Type: Flows
Action Name: InvokeFlow
Flow: <Select the flow created in Step 2>
Set the following variables:
- varUserID Formula $User.Id
- varOpportunityID Reference [Opportunity].Id
- varOpportunityStage Reference [Opportunity.StageName
The end result looks like this…

E. Now, we need to activate the process builder by clicking on the Activate button in the upper right hand corner.

That’s it! Congrats! You’ve implemented a process to create a follow up task if an opportunity’s stage changes to specific values for a specific opportunity record type.
Now, before you deploy the changes to Production, you need to test your configuration changes.
1.Login as a user and create a new opportunity with the Opp2 record type.
2. Update the stage to Prospecting and save.
A. Confirm a follow up task is created per the wait number and unit with the correct task subject.
3. Repeat Steps 2 and 2a for each of the other stages: Qualification, Closed Won and Closed Lost
4. Create a new opportunity with the Opp1 record type.
5. Update the stage to Prospecting and save.
A. Confirm that a follow task is not created.
6. Repeat Steps 5 and 5a for each of the other stages: Qualification, Closed Won and Closed Lost
Deployment Notes/Tips:
- The new custom metadata type, custom metadata type record, process builder and flow can be deployed to Production in a change set.
- You will find the custom metadata type information under the Custom Metadata Type in the Component Type dropdown. However, locate the data records for the custom metadata types by looking for the custom metadata type names in the Component Types dropdown.
- You will find the visual workflow components in a change set under the Flow Definition component type.
- Activate process builder and flow as they is deployed as inactive into Production.

Hi Jen,
Can you please provide info on how you created Wait flow element in this exercise?
Thanks,
Samy
LikeLike
Hi Samy. Thank you for letting me know I missed a step in the blog post. It’s been added.
LikeLike