

Note: This flow solution runs only in Lightning Experience.
Have you ever wanted to use flow but your use case doesn’t call for any user interaction, you don’t want your flow to execute on a button or quick action click? Do you have a situation you are automating but can’t use process builder because you want to redirect the user to another record at the end of your flow? You’re in luck, you can use a screen flow with a blank screen to run the hidden flow. Yup, you heard me. A BLANK screen flow.

I want to give a shout out to Sam Friedewald. I saw his flow presentation at MidWest Dreamin’ 2018. He has a very unique flow implementation where he had a blank flow screen that ran a hidden flow upon record page load. I used his idea in my most recent flow solution.
This post was inspired by a flow question posed by Stacey Cogswell in our Twitter DM group. Thanks, Stacey!
Here are a few lessons learned from implementing this use case:
- Learn how to add flow a Lightning record page.
- Learn how to use component visibility to determine when to show components on a lightning record page.
- Learn about using local actions in flow.
- Provide descriptions, where provided, in Salesforce. This may be tedious step, I know, but your future self will thank you when you are trying to remember what you configured or assist other/future admins when troubleshooting or enhancing what was built. This includes variables, the purpose of a flow, what each flow element does, etc.
Business Use Case: Addison Dogster is the system administrator at Universal Containers. Mary Markle is the Director of Operations. She mentioned to Addison that when an opportunity is marked closed won, she wanted a new task created and the user taken to the newly created task record.

While Addison can build a process using process builder to create a task when the opportunity stage is changed to closed won, she cannot redirect the user to the task record page. However, Addison knows that she can use a Open SObject local action to take the user to the newly created task record. But, in order to use a local action, Addison must use a screen flow. What if, we our flow has blank screen which looks transparent to the end user and can be placed somewhere at the bottom of the record page? That would work…
Quick Steps:
Pre-requisites:
- Enable My Domain in your org. This is required to use aura components in your flow.
- Enable lightning runtime feature on the Process Automation Settings screen
- Install the following two local actions in your org: showToast and Navigate to sObject.
1. We need to create a custom checkbox field on the Opportunity object that is used as a processing field for our flow. Go to Setup | Object Manager | Contact | Fields & Relationships, create a new field. Do not add this new field to the page layout as this is a behind-the-scenes processing field but give edit access to this field to any users who will execute this flow.
Best practice tip: Provide a description so you and other/future admins know what this custom checkbox field is used for.

2. Now, let’s create the flow. In Lightning Experience, it is found under Process Automation | Flows.
Here is the flow we are going to create. This flow will lookup the processing field and name of the opportunity record. If the opportunity record is not yet processed, it will automatically create a task, show a success message that it was created and take the user to the newly created task record. Then, we will check the processing field on the opportunity record. Lastly, it will take the user to the blank flow screen. If the processing field is checked, then the flow will end with the blank flow screen.

A. Let’s create our flow resources.
The first variable resource is called “recordId.” This is case sensitive and is a reserved variable name used by Salesforce to denote the record Id of the detailed record page. This needs to be specified as “Input Only” under the Availabity Outside this Flow section. We will be passing the recordId from the Lightning record page into this flow.
Best practice tip: Provide a description so you and other/future admins know what this flow resource is used for.

The variable “varOppRecord” will hold the opportunity record we find in our query in our first flow step Get Records. This is a sobject variable as we want to pull in information for a single Salesforce record. This is denoted by specifying the Data Type as “Record.”
Best practice tip: Provide a description so you and other/future admins know what this flow resource is used for.

The variable “varTaskId” will hold the task record Id created in the step Create Records. We will use this variable to redirect the user to the task record page at the end of the flow.
Best practice tip: Provide a description so you and other/future admins know what this flow resource is used for.

Next, we will create two formula resources that we will reference in our Create Records flow element to create the new task.
The formula “CurrentUserFormula” will reference the current user’s Id for task assignment in the Create Records flow element.
- Data Type: Text
- Formula syntax: {!$User.Id}
Best practice tip: Provide a description so you and other/future admins know what this flow resource is used for.

The formula “DueDateFormula” will set the activity date to 3 days from today’s date.
- Data Type: Date
- Formula: Today() + 3
Best practice tip: Provide a description so you and other/future admins know what this flow resource is used for.

B. First, we will add a Get Records flow element on the opportunity record to pull processing and name fields where the Id equals the recordId. We will store the record found in the sObject variable varOppRecord.
Best practice tip: Provide a description so you and other/future admins know what this flow element is used for.

C. Next, we are going to determine whether the record has been processed using the Decision flow element. The Not Processed outcome’s criteria is {!varOppRecord.Processed__c} Does Not Equal {!GlobalConstant.True}. Essentially, the processing checkbox is unchecked.
Best practice tip: Provide a description so you and other/future admins know what this flow element is used for.

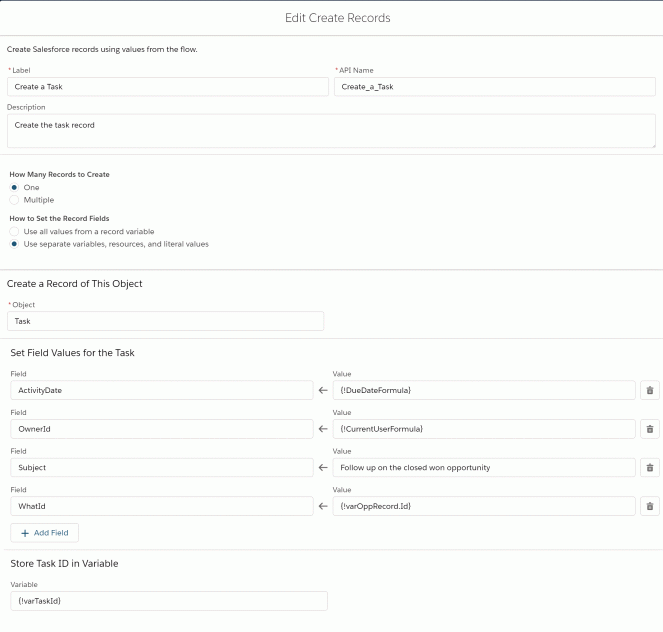
D. Next, we will use a Create Records flow element. We will create a single task record.
- Object: Task
- Set the following fields:
- ActivityDate: {!DueDateFormula}
- OwnerId: {!CurrentUserFormula}
- Subject: Follow up on the closed won opportunity
- WhatId: {!varOppRecord.Id}
- Store Task in Variable: {!varTaskId}
Best practice tip: Provide a description so you and other/future admins know what this flow element is used for.
E. We will then create a Core Action flow element and select the showToast (local action aura component) to show a success message after the creation of the task.
Set the following attributes:
- Message toggle: Include
- Message: A new task was created for opportunity {!varOppRecord.Name}
Best practice tip: Provide a description so you and other/future admins know what this flow element is used for.

F. For our next flow element, we are using a Core Action (Open SObject, local action aura component). This local action takes the user to a record page — in this case, to the newly created task contact record page. For the sObject attribute on the Inputs tab, select the {!varTaskId} variable.
Best practice tip: Provide a description so you and other/future admins know what this flow element is used for.

G. We will now add an Update Records flow element to update the processing field on the opportunity record.
- Object: Opportunity
- Filter: Id Equals {!recordId}
- Set: Processing__c to {!$GlobalConstant.True}
Best practice tip: Provide a description so you and other/future admins know what this flow element is used for.

H. Now, we need to create our blank Screen flow element. Under the Configure Frame section, deselect both Show Header and Show Footer.
Best practice tip: Provide a description so you and other/future admins know what this flow element is used for.

I. Add the subflow Send Flow Fault Email. For instructions on how to create this, go to Step 2 of blog post: Maximize Maintainability With Process Builder and Componentized Visual Workflow.
Best practice tip: Provide a description so you and other/future admins know what this flow element is used for.
Set the following attributes:
- varCallingFlowName: Create a Task for Closed Won Opportunity
- varFaultMessage: {!Flow.FaultMessage}

J. Connect the flow elements, outcome connector and the fault connectors to match the below…

K. Save/Save As and provide the following properties.
Best practice tip: Provide a description so you and other/future admins know what this flow is used for.

L. Click the “Back” button.
M. Locate the flow and click on the Create Task For Closed Won Opportunity name.
N. On the flows screen, activate the flow.

3. Now, we need to add the Flow standard components to the Opportunity Lightning record page via Lightning App Builder.

Locate the Flow component that we configured in Step 2 and drag it to the desired location on the page. Don’t forget to check the box next to “Pass record ID into this variable”, which is the recordId variable.
For the Component Visibility, we will set up the filter so Stage equals Closed Won. Otherwise, the component will be hidden to the user.
Click the Save button and hit Back.
4. You will need to create a process under Process Automation | Process Builder. This will be run on the opportunity object that executes when the stage is changed and the stage is not Closed Won. It will then update the processing field to false. This is needed for when an opportunity is changed from Closed Won to another value. We want to uncheck the processing field so that if the opportunity is changed later to Closed Won, it will execute the flow again.


Set Conditions to the following:
- [Opportunity.StageName] Is changed Boolean True
- [Opportunity.StageName Does not equal Picklist Closed Won


Activate the process.
That’s it! You’ve configured the changes.
Now, before you deploy the changes to Production, don’t forget to test your configuration changes.
- On an opportunity record, update the status to Closed Won.
- You will get a success message and be redirected to the new task record.
- Go back to the opportunity record, update the status to something else.
- Behind the scenes, the process field is unchecked.
Deployment Notes/Tips:
- The flow, process, custom field and lightning record page can be deployed to Production in a change set (or can be deployed using a tool such as Dreamfactory’s Snapshot).
- Don’t forget to update the custom field’s FLS for the profiles that will use the flow.
- You will find the flow in a change set under the Flow Definition component type.
- Activate the flow post deployment as they deploy inactive in Production, unless with Winter ’19, you have opted in on the Process Automation Settings screen, to “Deploy processes and flows as active.” NOTE: With this change, in order to successfully deploy a process or flow, your org’s Apex tests must launch at least 75% of the total number of active processes and active autolaunched flows in your org.

@Jen,
Very clever use of Flow! So timely, I have a use for this today.
Thanks.
=Adam=
LikeLike
Cool!
LikeLike
This is an awesome use of blank screen, great idea.
Thanks, Ritwik.
LikeLike
@Jen Hi,
As always, thank you very much for your amazing solutions and detailed guides!
I wanted to ask you what is the difference between the Send Flow Fault Email Subflow you’ve created and the Out of the Box flow fault message Salesforce sends when an error occurs?
Best Regards,
Gidi
LikeLike
This fault error subflow allows you to send an email to a general email to let the team know there was an error. The out of the box flow fault is the most useful but only the person who created or last modified the flow gets the error email or if you added users to the apex exception email, which means you will get the apex errors as well.
LikeLike
Very Nice Article ! Nicely explain the Flow using a blank screen, Keep updating
LikeLike
Thank you
LikeLike
Exactly the solution I was looking for today! Thanks for the great article!
LikeLike
Glad you found it helpful
LikeLike
Hey Jen,
This is what I had been searching for. Thank you!
By the way, I think there is a typo error at creating the Processed Field, the Path to create this field is at the Opportunity Object instead of Contact object.
“1. We need to create a custom checkbox field on the Opportunity object that is used as a processing field for our flow. Go to Setup | Object Manager | Contact | Fields & Relationships, create a new field. Do not add this new field to the page layout as this is a behind-the-scenes processing field but give edit access to this field to any users who will execute this flow.”
LikeLike
HI Jen Anyway to do this but using a action to call the flow? I am trying to replace the “Accept Button” when the case is in the queue. I calling a flow using a action but when I added the flow to the lightning page every time you open a case and it meets the criteria the case gets updated to the $UserId and status working.
LikeLike
You can use an autolaunched flow and call it from a quick action.
LikeLike
Hi Jen,
I did try using the autolaunched flow but the issue is when the flow ends the screen stays in the screen and needs to be exit out. I am using the navigate anywhere action but it doesnt redirect.
I am using ligthning console but I get the same resuts in regular app.
LikeLike
There is nothing you can do with a lightning console app. I ran into the same issue myself. In a regular app, you should be able to have it take you to the record using navigate anywhere.
LikeLike